Working with DataGrid in WPF

Adding DataGrid control on your WPF project is as simple as dragging in the control and setting the ItemSource property to the list of objects.

but before you can do that you need to make sure that your project
"Target framework" is .NET Framework 4 or above and not .NET Framwork 3.5
you can simply change this by going to the project property and change the "Target framework" to .NET Framework 4

after that you can add the DataGrid Control on you WPF form, also make sure that you set the AutoGenerateColumns property to true.
I created a class Person and just populate a list of Persons and setting the datagrid.ItemSource property to the list of person.

using System;
using System.Collections.Generic;
using System.Linq;
using System.Text;
using System.Windows;
using System.Windows.Controls;
using System.Windows.Data;
using System.Windows.Documents;
using System.Windows.Input;
using System.Windows.Media;
using System.Windows.Media.Imaging;
using System.Windows.Navigation;
using System.Windows.Shapes;

namespace WpfApplication2
{
    /// 
    /// Interaction logic for MainWindow.xaml
    /// 
    public partial class MainWindow : Window
    {
        public MainWindow()
        {
            InitializeComponent();
        }

        private void Window_Loaded(object sender, RoutedEventArgs e)
        {
            List persons = new List();

            persons.Add(new Person() { FirstName="John", LastName="Doe", Age = 36, Address="12313 some address" });
            persons.Add(new Person() { FirstName = "Dolores", LastName = "Doe", Age = 23, Address = "12313 some address" });
            persons.Add(new Person() { FirstName = "Roxanne", LastName = "Doe", Age = 26, Address = "12313 some address" });
            persons.Add(new Person() { FirstName = "Robert", LastName = "Doe", Age = 31, Address = "12313 some address" });

            this.dataGrid1.ItemsSource = persons;
        }
    }


    public class Person
    {
        public string FirstName { get; set; }
        public string LastName { get; set; }
        public int Age { get; set; }
        public string Address { get; set; }
    }
}

note: if the ItemSource does not refresh when you do some changes on your collection then call dataGrid.Items.Refresh()

WPF InvokeRequired equivalent

To those who are familiar with the WinForm InvokeRequired, this is will return a boolean true if a UI is being access on a different thread.

the Equivalent WPF for this is:

Declare a delegate function.

        protected delegate void Invoker(string message);


and the actual method that does the UI Update

        public void UpdateUI(string message)
        {
            if (this.richTextBox1.Dispatcher.CheckAccess())
            {
                this.richTextBox1.AppendText(string.Format("{0}: {1}\r", DateTime.Now, message.Message));
            }
            else
            {
                this.richTextBox1.Dispatcher.Invoke(new Invoker(UpdateUI), message);
            }
        }


basically you will just call the UpdateUI on the event handler method.
        protected void StateChange(object sender, StateChangeArgs args)
        {
            UpdateUI(args.Message);
        }


Which is quite simple

Adding Splitter (GridSplitter) in WPF

I am originally a WinForm developer, recently i tried venturing to WPF just for fun.

So, I tried to create my first WPF UI, at first I thought adding a splitter would be straight forward like in WinForm development. So I was trying it out (Note: I have no idea on how to do it in WPF), after a while it gets kind of frustrating. since VS doesn't give you things out of the box, you need to make it. I search the internet but, with my short attention span I quickly lose interest reading the post.

So Lets Start this tutorial already!

Couple of notes:
- I would suggest to not use the WYSIWYG editor in VS.net instead check the XAML codes for more control in coding and less frustrations.

Step 1:- We create a new WPF Project by going to:
Files->New->Project
Navigate through the predefine project template select "Windows" and then choose WPF Application

It will create a new project and the initial XAML code similar to this:


testing


Notice there is a default Grid Tag this will serve as our working area.

Step 2: Defining the Rows or Columns for your Grid for the simplicity of this example we will only add Rows we can do this by adding the Grid.RowDefinitions tag right after the Grid Tag


Note: I declared 3 row definitions which means this Grid will have exactly 3 Rows. this is to accommodate 3 possible containers, for this example we have an upper content, the GridSplitter, and finally the lower content.

Also notice that I declare the Heights to *, Auto, 200, * means it will use the remaining space, while Auto will try to automatically calibrate its height, and 200 will be its height in pixels, you can also add a MinHeight Attribute to control its minimum height.

Step 3: Adding the Contents:


So this is the Actual Content, notice I added Grid.Row (starts with an index of 0) attribute for each control, this is to identify which control belongs to what row. you can also use Grid.Column if it was a vertical partition.


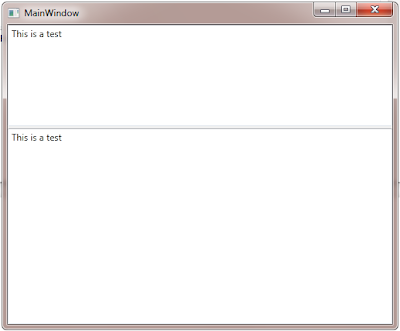
The finish product:


Although this is very simple example, nothing limiting you to do fancy stuff, like by grouping each section with another Grid and Placing the necessary Grid.Column, or Grid.Row Attribute. which would allow a "Nesting" of GridSplitter.

Overall managing this controls is much easier when dealing directly with the XAML script.

HttpWebRequest Keeping Cookie Alive

Before, I had a hard time understanding on how to keep a certain session alive when using HttpWebRequest, and accessing a protected page where it requires login.

it turns out to be very easy, all you need to do is set the CookieContainer, notice that I declared the CookieContainer as static. This is so that different request can share the same cookie.

using System;
using System.Collections.Generic;
using System.Linq;
using System.Text;
using System.Web;
using System.Net;

namespace WebRequestSample
{
public abstract class RequestBase
{
   protected static CookieContainer cookieContainer = null;

   protected HttpWebRequest CreateRequest(string uri)
   {
       if (RequestBase.cookieContainer == null)
           RequestBase.cookieContainer = new CookieContainer();

       HttpWebRequest request = (HttpWebRequest)HttpWebRequest.Create(uri);
       request.CookieContainer = cookieContainer;
       return request;
   }
}
}


Now all you need to do is inherit RequestBase. and call CreateRequest

using System;
using System.Collections.Generic;
using System.Linq;
using System.Text;
using System.Web;
using System.Net;

namespace WebRequestSample
{
    public class SampleRequest : RequestBase
    {
  public void Login(string postToFormAddress, string username, string password) 
  {
   HttpWebRequest request = this.CreateRequest(postToFormAddress);
   //note: you need to check the html form and make sure to post all input variables including the submit button value
            string loginData = string.Format("username={0}&password={1}&submit=login", username, password);


            ASCIIEncoding encoding = new ASCIIEncoding();
            byte[] loginDataBytes = encoding.GetBytes(loginData);

            request.Method = "POST";
            request.ContentType = "application/x-www-form-urlencoded";

            request.ContentLength = loginDataBytes.Length;
            Stream stream = request.GetRequestStream();
            stream.Write(loginDataBytes, 0, loginDataBytes.Length);
            stream.Close();
            HttpWebResponse response = (HttpWebResponse)request.GetResponse();
   
   StreamReader sr = new StreamReader(response.GetResponseStream());
            string htmlBuffer = sr.ReadToEnd();
   
   // todo: check the htmlBuffer if it contains data that requires login, if you find it then you have successfuly logged in!
  }
    }
}

How to add DragDrop events on C#

If you are trying to figure out how to add DragDrop events in a c# control, coming an external file, then you've come to the right place.

DragDrop items are very useful, if you are trying to develop a tool that deals with external files. This can also be achieve with a FileBrowserDialog, but DragDrop items are more elegant IMO.

So, first you go to the c# control you wish to have this event. Go to the control property window and check if the control supports DragDrop and DragEnter events. In this case I'm using and extended ListView control.


We want to subscribe to the DragDrop, and DragEnter events. All you need to do is double click the events and it should generate proper codes you'll need later on.

DragEnter event, happens when a file is being drag into/over the control, here we want to simulate some effects by changing our mouse cursor (to achieve richer user experience).

      private void listView1_DragEnter(object sender, DragEventArgs e)
      {
          if (e.Data.GetDataPresent(DataFormats.Text))
          {
              e.Effect = DragDropEffects.Copy;
          }
          else if (e.Data.GetDataPresent(DataFormats.FileDrop))
          {
              e.Effect = DragDropEffects.Copy;
          }
          else
          {
              e.Effect = DragDropEffects.None;
          }
      }

To examine the code, first we have some bunch of if statements, checking for data formats. we specified that we want to change cursor when it is equal to DataFormats.FileDrop, DataFormats.Text. if you place a break point and drag a file into the control with this event it should go into the second if statement (with the DataFormats.FileDrop).

Now we want to add an event to handle the DragDrop action, this happens when a file is released(Dropped) on top of the control.

      private void listView1_DragDrop(object sender, DragEventArgs e)
      {

          if (e.Data.GetDataPresent(DataFormats.FileDrop, false) == true)
          {
              string[] files = (string[])e.Data.GetData(DataFormats.FileDrop);
// todo: validate array of files and check if this type of files are allowed on your application
// todo: do actual processing of the files given you have the file path
          }
      }

In here we only checked for, if it is a DataFormat.
if (e.Data.GetDataPresent(DataFormats.FileDrop, false) == true)

To get the files that has been DragDrop inside the control we used e.Data.GetData which is a DragEventArgs. GetData returns an object so we need to cast it to an array of string.
string[] files = (string[])e.Data.GetData(DataFormats.FileDrop);

After this we should already have the complete File path of the items being DragDropped into the control. here we do our processing/logic of the actual files which is stored in (string[] files).

that should do the trick.

How to increase connections on httpwebrequest c#

I've been playing with C#, and made a Multi-threaded application that would scrape a page from a certain site. I set 4 threads to scrape the address it worked perfectly on Windows XP, but noticed in Windows Vista Windows 7, it is only 2 threads at maximum the rest are in waiting state.

I've search on how to do it on the web but most suggested to modify the registry.
I explored MSDN and found a way to do it in code

System.Net.ServicePointManager.DefaultConnectionLimit = 4;


This simple line worked perfectly on Windows 7 and Vista

How to Install Asp.net MVC 2.0

I was playing around Visual Studio 2008 a couple days back, my co worker who is assigned in the web development department caught my eye. I was curious on what he was doing and asked him questions about Asp.Net MVC, if it was a third party framework like spring.net, it turns out Microsoft is the one releasing this framework, but a community is maintaining the code which I thought was a good thing. Prior to this I have already used CAKEPHP which is also an MVC framework. I got excited and asked more about it.

To Install Asp.net MVC follow this link:

http://www.microsoft.com/downloads/details.aspx?FamilyID=C9BA1FE1-3BA8-439A-9E21-DEF90A8615A9&displaylang=en

requirements:
SP1 of visual studio 2008
at least .Net 3.5 framework
Supported OS: XP windows 2000, Windows Vista, Windows 7

I ran into a problem regarding with the project not appearing on the selection menu which is described here.

You need to select:
File->New->Project

Instead of selecting from:
File->New->Web Site
which will only give you the following selection:

How to reset Visual Studio 2008 settings

I recently installed ASP.net MVC on visual studio 2008, all installation had completed but the Asp.Net MVC project is not appearing on the selection when creating a new web project.

A website suggested to reset the settings in Visual studio 2008
Tools -> Import and Export Settings select (reset all settings...). But I forgot that i was currently opening 2 environments this causes the wizard to hang. I killed Visual studio 2008 in task manager and restarted it.

But now its not loading the IDE properly it is in a hanged state where in it is trying to initialize itself, I needed a way to reset the settings manually.

I've search MSDN and found a manual way of resetting it through command

here's the command

devenv /resetsettings

devenv.exe is usually found under c:\program files\Microsoft Visual Studio 9.0\Common7\IDE\

that should do the trick

Proudly powered by Blogger
Theme: Esquire by Matthew Buchanan.
Converted by LiteThemes.com.